Hey, some of you may remember this one from the old PTT, but in case you don't... here it is.
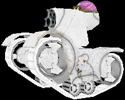
It's purpose is to help you line up all of the parts of the tank, it will save you a TON of time. Everything is completly aligned, I spent a long time making this absolutley perfect. I also put it through a threshold to remove all the fuzzy edges and the blurry stuff in the black area. It should make skinning a lot easier for you.
So, I hope this is of some use to you . Here it is:
http://www.maj.com/gallery/Zaninator/ThinkTanks/linetemplate_v3.0.bmp
Or, if you'd rather not bother with all of the split lines and lineup ridges, here's a more simplistic version:
http://www.maj.com/gallery/Zaninator/ThinkTanks/linetemplate_v3.0simplistic.bmp
The template is a .bmp file to preserve color! You will need to convert your final product into a .jpg if you want it to work!!
(Thanks for the sticky Lone )
---------------------------------
Updated parts of v3:
-Lines have been split in case you want to divide a section in half
-Little ridges have been added on the sides for prescision lineups.
DAZZLE'S UPGRADE PACK
If you haven't already done so, upgrade your game by downloading Dazzle's all-in-one upgrade pack. It comes with everything you need for today's servers. Does your blue bar freeze when joining servers? Do you lag in games? Do you get an annoying siren in Phobik's Servers? This is what you need. CLICK HERE TO DOWNLOAD.
Yarkl's Light Tank Template (Updated as of 6/17/07)
-
- Veteran Light
- Posts: 315
- Joined: Wed Dec 27, 2006 7:59 pm
- Location: Franklin, WI
- Contact:
Yarkl's Light Tank Template (Updated as of 6/17/07)
Last edited by Yarkl on Sun Jun 17, 2007 1:59 pm, edited 7 times in total.
-
- Veteran Light
- Posts: 315
- Joined: Wed Dec 27, 2006 7:59 pm
- Location: Franklin, WI
- Contact:
- CaptainBrains
- Veteran Member
- Posts: 459
- Joined: Fri Dec 29, 2006 11:21 pm
- Location: Illinois, the rest you'll have to find out your self. ;)
- Contact:
-
- Veteran Light
- Posts: 152
- Joined: Fri Aug 17, 2007 2:18 pm
- Location: OH
- Contact:
- MusickTMG
- Veteran Light
- Posts: 1903
- Joined: Mon Jun 25, 2007 8:59 pm
- Location: San Diego, California
- Contact:
Re: Yarkl's Light Tank Template (Updated as of 6/17/07)
thats a pretty cool
That is a cool tank as it is without editing it
Musick-TMG-
"I got a idea"
"I got a idea"
-
- Veteran Medium
- Posts: 444
- Joined: Fri Jan 12, 2007 7:42 pm
- Location: The world without shrimp
Re: Yarkl's Light Tank Template (Updated as of 6/17/07)
I decided to mess with the template a bit, make it more ... thorough, I suppose... and put some more stuff on it. All credit goes to Yarkl because he started it.
IMPORTANT:
-Get Skin Viewer 1.0 to view this template, to see where everything goes, because some of the stuff is kind of hidden and you'll need to rotate the tank a lot.
-The place where there are arrows - the arrows end up facing towards the middle of the tank. Red arrows will end up on the right side of the tank pointing left, black ones on the left pointing right.
-The place where the pieces with the arrows meet you'll have to line up yourself, because lineup ridges DO NOT WORK. The blue pieces are expanded a little by the tank shape, and so everything on the blue pieces will end up slightly bigger than things of the same size on the white pieces. Align and size things accordingly.
http://www.freewebs.com/monicattmed/lin ... ernate.bmp
The template is a .bmp file to preserve color! You will need to convert your final product into a .jpg if you want it to work!!